Aura Conversion
Contents
Convert the Aura
The Aura was developed to allow the pilot to change between the types of Aura if desired. By using the Aura Config Tool, the pilot can convert their Aura to any type of Aura they want.
The Aura is available in several distinct versions. Examples:
- Aura 8 - QQ Extra 300
- Aura 8 - Cessna 170
- Aura 8 - Mamba 10
- Aura 8 - Open Stock
|
The Aura 8 - QQ Extra 300, Aura 8 - Cessna 170, and Aura 8 - Mamba 10 are preinstalled in our Super PNP aircraft.
|
The Aura 8 - Open Stock can be installed in almost any airframe.
|
After Converting an Aura, any stored on the Aura will be Deleted and the Aura will be Restored to the 'out-of-the-box' state.
- Before converting, you may want to 'Read from Aura' and save the configuration to your PC.
Required Items and Preparations
You will need:
- Access to your Aura
- A PC with the Aura Config Tool installed and working
- A Micro USB Cable (provided with Aura)
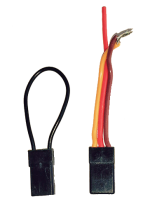
- A Spektrum Bind plug (it shorts the two 'end' connectors together (signal and ground)
- One can be made from and old servo or extension lead, be SURE NOT to make any connection to the center positive (typically red) wire.
Preparations to model
- Disconnect the all the power to the Aircraft, Aura, and Receiver
Preparations to your Windows PC or Tablet
- If you have not already done so, download and Install the PC Application
- In order to get the latest version of the Aura Firmware, you must be using the latest version of the Aura Config Tool.
- If there is an 'Aura Config Tool Update Available!' message in the bottom left corner of the Aura Config Tool, you can update the Aura Config Tool.
- To Update the Aura Config Tool, click Help --> Update Aura Config Tool, and let the application update.
- Be sure to update the Aura Config Tool on All devices you use.
Note: It may be required to add the Aura Config Tool to your PC's antivirus/firewalls "Trusted Apps", the path to the Aura Config Tool can be found by right clicking on it in the Windows Task Manager.
Conversion Procedure
- Confirm power the Aura is completely powered OFF
- Launch the Aura Config Tool
- Plug the Micro USB connector into your Aura
- Plug the USB connector into your PC (this will power up the Aura for the Conversion)
- Allow a few seconds for the drivers to find the Aura
- Click the Connect button in the lower right of the Aura Config Tool
- Click on Aura Tools -> Convert Aura
- Select the desired type of Aura you would like after the conversion is complete.
- Follow the dialog boxes to accomplish the conversion.
- Enter your email address
- Click 'Download and Convert Aura'
- When prompted after downloading the conversion, Insert the Bind Plug in Aura Port S7 and click 'Yes'.
- The Aura will restart, the orange LED will flash quickly as the Aura Conversion progresses.
- Please wait while the Aura is converted.
- After the conversion, remove the Bind plug from Port S7 and click 'OK' to finish the conversion and restart the Aura.
- Some very early Aura's may need to be restarted by cycling power manually. Please follow the on-screen prompts as directed.
- Remove the Micro-USB cable after the Conversion is complete.
Aura Conversion Verification
Verify the Conversion
- Connect the Micro USB cable between the Aura and PC
- Click the Connect button in the lower right of the Aura Config Tool
- Check the Aura Status Monitor at the top right of the Application window. You should see the new Aura type listed (such as "Aura 8 Open Stock" or "Aura 8 Cessna 170").
For any questions, contact us at Aura Support
