Difference between revisions of "Aura/FWUpdate"
From Flex Innovations Wiki
m |
|||
| Line 32: | Line 32: | ||
====Preparations to PC==== | ====Preparations to PC==== | ||
*If you have not already done so, download and install the [http://store.flexinnovations.com/aura-config-tool/ Aura Config Tool] PC Application | *If you have not already done so, download and install the [http://store.flexinnovations.com/aura-config-tool/ Aura Config Tool] PC Application | ||
| − | *If you have previously installed PC Application, make sure it is closed, and re-open it. You may have an | + | *If you have previously installed PC Application, make sure it is closed, and re-open it. You may have an ''update'' available. If not prompted, click on ''HELP->Update Aura Config Tool'', and let the application update if needed. |
*Click on ''HELP->Aura Config Tool'' Info. Your Aura Config Tool version should be 1.1.0 or higher | *Click on ''HELP->Aura Config Tool'' Info. Your Aura Config Tool version should be 1.1.0 or higher | ||
| − | **If you do not have 1.1.0 or higher, restart you PC and check again. | + | **If you do not have ACT 1.1.0 or higher, restart you PC and check again. |
===Update Procedure=== | ===Update Procedure=== | ||
Revision as of 14:28, 6 January 2016
Contents
Updating FirmWare to V1.2
Note: For early Extra customers, this is a mandatory update. Flying the Extra with V1.0 is not authorized. Aircraft shipped to consumers in the USA before August 10, 2015 require this update.
- QQ Extra Aura Requires V1.1 or higher
- Open Stock Aura requires V1.2 or higher. (V1.2 is the first version shipped for Open Stock)
Note: This is a long description of a relatively simple procedure.
Firmware 1.2 offers these updates for Extra Users
- Improved booting. Fixes a rare issue where the Aura could hang during power-up
- Added 'Quick' features; Quick Trim, and Quick Check.
Required Items and Preparations
You will need:
- Access to your Aura
- Your Transmitter and Receiver
- Only Spektrum brand DSM2/X Remote and SRXL Receivers are tested and approved for use
- Only Futaba and FrSky brand S.Bus receivers are approved for use
- Only JR brand X.Bus receivers are approved for use
- A Micro USB Cable (provided with products)
- A power source for your Aura
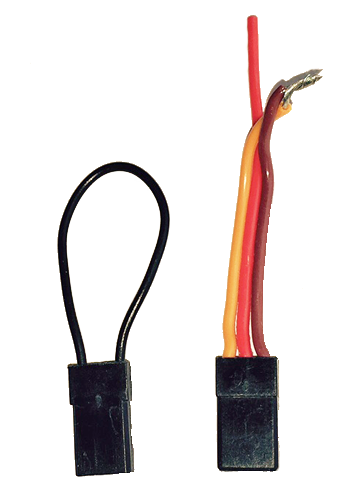
- A Spektrum Bind plug (it shorts the two 'end' connectors together (signal and ground)

- One can be made from and old servo or extension lead, be SURE NOT to make any connection to the center positive (typically red) wire.
Preparations to model
- Your Transmitter should be programmed (starting with a blank model) with the settings in the manual, or as test flown.
- Remove your Propeller for safety and/or disarm the propulsion system
- Bind receiver to transmitter if required using procedures described in the related manuals (DSM Satellite, JR DMSS, and conventional servo lead (PWM) customers should refer to the included Manual Addendum)
- On the ground, verify your radio is 'detected' and linked, and your transmitter controls the model. Troubleshooting Guide is here.
- Disconnect the power (flight battery) to the model and switch off the transmitter
Preparations to PC
- If you have not already done so, download and install the Aura Config Tool PC Application
- If you have previously installed PC Application, make sure it is closed, and re-open it. You may have an update available. If not prompted, click on HELP->Update Aura Config Tool, and let the application update if needed.
- Click on HELP->Aura Config Tool Info. Your Aura Config Tool version should be 1.1.0 or higher
- If you do not have ACT 1.1.0 or higher, restart you PC and check again.
Update Procedure
Update the Aura Firmware
- Confirm power is NOT connected to your Aura
- Launch the Aura Config Tool
- Plug the Micro USB connector into your Aura
- Plug the USB connector into your PC (this will power up the Aura unit)
- Allow a minute for the drivers to find the Aura (look for indications that it was successful)
- Click the CONNECT button at the lower right of the Application window
- Click on Aura Tools -> Update Aura Firmware
- Follow the dialog boxes to accomplish the update. (OK->Download and Install Firmware Update->Insert Bind Plug in Aura port S7->YES->)
- After the procedure is complete, follow prompts to remove bind plug and power, then click OK.
Verifications and Flight Readiness Checks
Verify the Update
- Turn on your transmitter and apply power to your Aura/airborne system. Leave the model stationary for a few seconds to allow it to calibrate and boot
- Verify that you have control of the model
- Check your Aura status lights. You should see:
- Orange Solid LED indicating the sensor is calibrated and the Aura is powered and running
- A slow blinking Orange LED indicates excessive movement during sensor calibration, and it is best to do the power-up over.
- Green Solid LED indicating the Aura has a valid signal from the Tx/Rx
- You should NOT see a Blue Solid LED which is an indication of Failsafe for a DSM Satellite (other radio installs just follow the Receiver's 'valid' failsafe commands). Satellite users can test this by switching off your transmitter if you choose.
- Orange Solid LED indicating the sensor is calibrated and the Aura is powered and running
- With the Transmitter and Receiver still powered, Reconnect the USB cable
- Click the CONNECT button at the lower right of the Application window
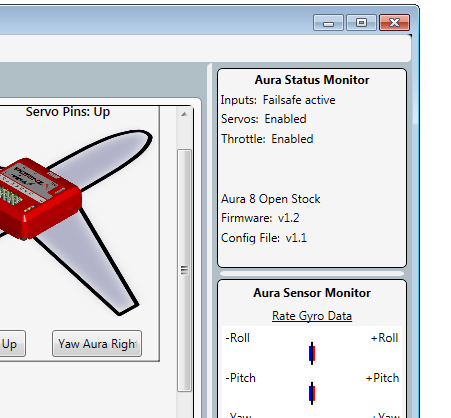
- Check the Aura Status Monitor at the top right of the Application window. Verify Firmware (version) 1.2

- Note: This information will not be displayed if your Rx/Tx is not connected and Aura is allowed to go into Auto-Detect mode
Preparation for flight
- Conduct and pass the Flight Control Sensing Direction Test on per your manual.
- Conduct and pass the (transmitter) Control Direction Test on per your manual.
- With the model secured, perform a Failsafe Test (Include the throttle servo for fuel powered aircraft with the engine OFF)
- Re-install the Propeller/enable your power system (with the model secure and the prop clear, repeat Failsafe test again)
- Perform a normal range check, and Fly!!
For any questions, contact us at AuraSupport