FlexJet Pro Turbine Conversion Assembly
From Flex Innovations Wiki
Contents
FlexJet Pro Turbine Conversion Assembly Notes
The following is an outline of the steps needed to convert the FlexJet Pro ARF to a turbine operation. These instructions supplement the main assembly manual. Many steps can be accomplished in a different order.
Mount the Turbine


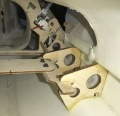
- Dry assemble and test fit the mounts.
- Fit the parts together as shown and check the fit in the model adjust the parts as needed for a close but relaxed fit.
- The Turbine may be mounted with screws of the modelers choosing. We used 4-40 SHCS's with Washers and Blind Nuts. Others may choose Sheet Metal Screws (#3 or #4). Screws are easily accessed through the Main Landing Gear Doors. Screws that accept a ball end hex driver are greatly preferred.
- Doublers are provided to thicken the Mounting Rails in the screw area.
- A JIG PLATE is provided to substitute for the Turbine during fitting and gluing. Typically it can be mounted to one side of the turbine mounts, installed in the model, then the second turbine mount can be screwed into place.
- The TWO holes per side on the Rails are used for the KingTech K45G3 and the JIG PLATE. Lines are etched into the part, To Clear the KingTech Mount, you will want to cut the Rails back to these lines.
- The THREE holes per side are for the Xicoy X45 (based on factory drawings, please test fit)
- With the Jig Plate still in place, mark two sets of lines at the back of the Rails for tailpipe mounting. Make one set 7mm (primary) and one set 11mm (alternate) forward of the aft edge of the rails.
- Center the tailpipe mounts between the rails and mark the width of the hole locations on the lines made just above.
- Drill holes for the tailpipe mounts in the rails and test fit the screws. (#3 or #2 Socket Head Sheet Metal Screws are a good choice)
- Fit the parts together as shown and check the fit in the model adjust the parts as needed for a close but relaxed fit.
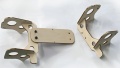
thumb|Turbine Mounts
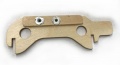
Rail Fasteners
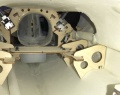
Trial Fit

- Once the parts are fitted, glue the Mounting Rails to the Sub-Formers as shown using CA.
- Install the mounts into the fuselage again and glue the sub-formers to the fuselage with Epoxy.
- Use a 15-30 minute or greater epoxy. You can use a thixotropic epoxy such as Hysol 9462, or thicken conventional epoxy slightly with milled glass fiber. A long popsicle stick or balsa stick can be used to apply and spread the glue.
- The exact fore/aft distance of the mounts is set with the 105??mm long Plywood Strips included which go forward to the main landing gear mounts as shown. These can be glued in at a convenient time with CA or Epoxy. (Make sure they are far enough into fuselage so they do not interfere with Door Actuation).
- Once the glue is well cured, remove the Jig Plate and test fit the Turbine. NOTE: Fitting is easier and small alignment adjustments can be made if the holes in the turbine mounts are slightly oversize.
- Install the mounts into the fuselage again and glue the sub-formers to the fuselage with Epoxy.
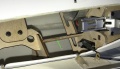
Locating Strip
Glue the Mounts
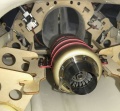
Mount the Turbine


Mount the Tailpipe
- Test fit the Plywood Ring over the back of the tailpipe. Smooth and adjust as needed.
- Test fit the Plywood Ring into the removable Nozzle. Adjust fit as needed so it seats well
- Glue the Plywood Ring into the Nozzle. (It can be spot glued in 8-12 places, it does not need a lot of glue)
- From the aft end of the model put the tailpipe into the fuselage.
- It is easiest to install the Nozzle onto the Tailpipe then bolt the Nozzle to the Fuselage while the tailpipe is still loose and somewhat aft.
- Screw the Tailpipe to Rails. The hole alignment can be tweaked slightly by bending the aluminum mounts or bellmouth.
- Check the Tailpipe alignment to the engine. It can also be tweaked by bending the aluminum mounts or bellmouth.
Equipment Tray
- At the time of this writing, Flex Innovations has tested the KingTech K45 G3 and have found it to be a perfect match.
- The Zicoy X45 is very similar, and its mounting was considered in the design. It should be easily fitted as well.
- Flex Innovations in no way recommends turbines with greater than 4.5kg thrust.
- Turbines have very high exhaust gas velocities and can reach high speeds. Throttle management should be used.