Difference between revisions of "Aura/Professional"
From Flex Innovations Wiki
m |
m |
||
| Line 12: | Line 12: | ||
== Current Manuals == | == Current Manuals == | ||
| − | * [http://resources.flexinnovations.com/files/AuraPro_QuickStartOverview_v1p25_20250727.pdf | + | * [http://resources.flexinnovations.com/files/AuraPro_QuickStartOverview_v1p25_20250727.pdf Aura Professional Quick Start Overview (PDF) - English - Updated for Firmware v1.25+] |
** New for July 2025 to documents firmware v1.25+ features | ** New for July 2025 to documents firmware v1.25+ features | ||
* [http://resources.flexinnovations.com/files/Aura_Professional_User_Guide_v1_1.pdf Aura Professional User Guide (PDF) - English] | * [http://resources.flexinnovations.com/files/Aura_Professional_User_Guide_v1_1.pdf Aura Professional User Guide (PDF) - English] | ||
Revision as of 19:58, 26 July 2025
Aura Professional Overview
- Designed perfect for your larger and more complex fixed wing models!
- Two isolated high power battery inputs with Low-Voltage LED Indicators
- Automatic Battery Switching
- Dual Receiver Inputs to support SBUS Diversity
- External Sensor Port (Optional) to connect a vibration hardened external sensor for the harshest vibration and noisy enviornments (Turbines, 70cc+ Engines, etc)
- Up to 12 customizable Gyro-capable Servo Outputs for complex airplanes
- Quick Trim Buttons for Easy Quick Trim
- Quick Change Buttons to Change Gyro Correction directions, Flight Mode 1 3Axis/6Axis, Aileron/Elevon setup, and Gyro Gain Scaling without a PC
- Aura Professional Series Product Page
Current Manuals
- Aura Professional Quick Start Overview (PDF) - English - Updated for Firmware v1.25+
- New for July 2025 to documents firmware v1.25+ features
- Aura Professional User Guide (PDF) - English
- Aura Professional User Guide (PDF) - German
Aura Pro Specific Tips
Battery Choices

The choice of the battery/power supply is completely up to the user. Here are some suggestions based on our teams experience.
- We are primarily using LiPo and LiFe 2-cell batteries with high voltage servos and accessories for our Pro Class aircraft
- For smaller sized aircraft, each pack can be 1200 to 2500mAh
- For medium sized aircraft, each pack can be 2000 to 4000mAh
- For large sized aircraft, each pack can be 3000 to 6000mAh
- 15C or higher discharge ratings are generally a good choice solid voltage under load.
- EC3 Battery connectors should be used for high current capability.
- Flex Innovations sells several batteries intended for this use. They are linked on the product page.
- Our team generally does not use regulators. In the world of high voltage servos and lithium batteries, many consider the most reliable system is free of these regulators. In the past Spektrum (SPMVR6007, SPMVR6010) made ones that are since discontinued that can be used between each battery and the Aura Professional. The two regulators must be very well matched to keep the packs current draw balanced.
Aura Professional 8 and 12 Receiver Connection Diagrams
We recommend using it for throttle to make sure your throttle failsafe and throttle cut are controlled directly from the Transmitter.
- Receiver Connection options are shown below:
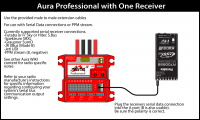
Aura Professional with One Serial Input

Aura Professional with Two Serial Inputs
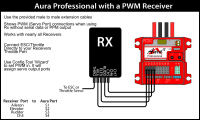
Aura Professional Servo/PWM Connections
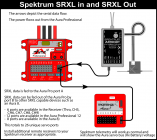
Aura Professional Spektrum SRXL In-and-Out
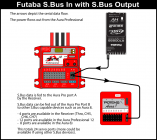
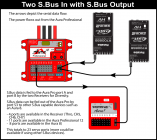
Aura Professional S.Bus In-and-Out
Aura Professional Dual S.Bus In and S.bus Out


Quick Trim with Aura Professional

This process transfers the trim in your transmitter into the Aura's subtrim.
- Fly and trim in any selected Flight Mode. Land.
- Leave Transmitter powered ON in the selected Flight Mode and set it aside.
- If using the latest firmware v1.25+:
- Hold down the Button #2 for about 5 seconds. When you observe a slow-flashing Blue LED, release Button #2.
- Press and hold Button #2 again for about 5 seconds. When the Blue LED starts flashing faster, the Transmitter Trims are now stored in Aura and you can release Button #2.
- Press and hold Button #2 a final time until the LEDs turn off. Release the button and the Aura will restart.
- If using an older firmware before v1.24:
- Power OFF the Aura Professional.
- Hold down the Button #2 and power ON the Aura. When you observe a slow-flashing Blue LED, release Button #2.
- Press and hold Button #2 again for about 5 seconds. When the Blue LED starts flashing faster, the Transmitter Trims are now stored in Aura and you can release Button #2.
- Power OFF the Aura then power it back ON.
- Re-center the transmitter trims.
- You are now finished! The Aura has learned the previous transmitter trims and the transmitter trims are centered. Enjoy your flight!
Connect to Aura Config Tool to Aura Professional
- To Connect the Aura Professional to the Aura Config Tool/PC, The Switch must be ON or Removed to Connect the Aura Professional to the Aura Config Tool.
- The USB can power the Aura but it will not power the servos. You do not need to Power the Aura Pro with batteries to connect to the PC, but the switch must be ON or removed.
Program the Battery LEDs Voltage Thresholds
- Use the Aura Config Tool to set the voltage thresholds for the Red Voltage Indicator LEDs
- The first 'higher' voltage sets the point where the Red LED will BLINK if lower.
- The second 'lower' voltage sets the point where the Red LED will be ON if lower.
External Sensor
The Aura Pro series has an External Sensor Port that allows the pilot to connect an Optional, Vibration/Noise Hardened External Sensor.
- The External Sensor is used for very noisy environments, most often with Turbines.
- The External Sensor can be relocated some distance away from the source of noise/vibration as well.
- The External Sensor can be configured in the Aura Config Tool.
- Aura Pro External Sensor Product Page