Difference between revisions of "Aura/FWUpdateDetail"
From Flex Innovations Wiki
| Line 1: | Line 1: | ||
===Updating Aura FirmWare to V1.3=== | ===Updating Aura FirmWare to V1.3=== | ||
| − | Note: For very early Extra customers who still have FW1.0, | + | Note: For very early Extra customers who still have FW1.0, it is mandatory to update. Flying the Extra with FW1.0 is not authorized. Aircraft shipped to consumers in the USA before August 10, 2015 require this update. |
:*QQ Extra Aura Requires V1.1 or higher | :*QQ Extra Aura Requires V1.1 or higher | ||
:*Open Stock Aura requires V1.2 or higher. (V1.2 is the first version shipped for Open Stock) | :*Open Stock Aura requires V1.2 or higher. (V1.2 is the first version shipped for Open Stock) | ||
Revision as of 13:46, 26 August 2016
Contents
Updating Aura FirmWare to V1.3
Note: For very early Extra customers who still have FW1.0, it is mandatory to update. Flying the Extra with FW1.0 is not authorized. Aircraft shipped to consumers in the USA before August 10, 2015 require this update.
- QQ Extra Aura Requires V1.1 or higher
- Open Stock Aura requires V1.2 or higher. (V1.2 is the first version shipped for Open Stock)
Note: This is a long description of a relatively simple procedure.
Firmware 1.3 offers these updates for QQ Extra and Open Stock Aura Users
- Improved interface between Aura and some Electronic Speed Controls (ESC's)
- Ability for Aura to recognize and use Spektrum AR7700 SRXL data (select servo Port B and use standard male to male cable)
- Fixes bug with Exponential values found in FW1.2 (see below)
- The Aura Config Tool introduces Live Save feature for faster adjustment of frequently used servo parameters. This eliminates the need to Write to Aura when doing select (and marked) adjustments.
- In the Aura Config Tool, Live Data is now selected globally for all Config Tool tabs in the Aura Status Monitor region at right. Live Data will now remain as set when you switch between tabs.
- Various bug, view, refresh, and stability improvements in the Aura Config Tool
Required Items and Preparations
You will need:
- Access to your Aura
- Your Transmitter and Receiver
- Only Spektrum brand DSM2/X Remote and SRXL Receivers are tested and approved for use
- Only Futaba and FrSky brand S.Bus receivers are approved for use
- Only JR brand X.Bus receivers are approved for use
- A Micro USB Cable (provided with products)
- A power source for your Aura
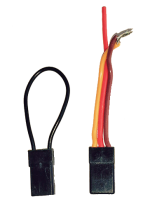
- A Spektrum Bind plug (it shorts the two 'end' connectors together (signal and ground)
- One can be made from and old servo or extension lead, be SURE NOT to make any connection to the center positive (typically red) wire.
Preparations to model
- Your Transmitter should be programmed (starting with a blank model) with the settings in the manual, or as test flown.
- Remove your Propeller for safety and/or disarm the propulsion system
- Bind receiver to transmitter if required using procedures described in the related manuals (DSM Satellite, JR DMSS, and conventional servo lead (PWM) customers should refer to the included Manual Addendum)
- On the ground, verify your radio is 'detected' and linked, and your transmitter controls the model. Troubleshooting Guide is here.
- Disconnect the power (flight battery) to the model and switch off the transmitter
Preparations to PC
- If you have not already done so, download and install the Aura Config Tool PC Application
- If you have previously installed PC Application, make sure it is closed, and re-open it. You may have an update available. If not prompted, click on HELP->Update Aura Config Tool, and let the application update if needed.
- Click on HELP->Aura Config Tool Info. Your Aura Config Tool version should be 1.1.0 or higher
- If you do not have ACT 1.1.0 or higher, restart you PC and check again.
Update Procedure
Update the Aura Firmware
- Confirm power is NOT connected to your Aura
- Launch the Aura Config Tool
- Plug the Micro USB connector into your Aura
- Plug the USB connector into your PC (this will power up the Aura unit)
- Allow a minute for the drivers to find the Aura (look for indications that it was successful)
- Click the CONNECT button at the lower right of the Application window
- Click on Aura Tools -> Update Aura Firmware
- Follow the dialog boxes to accomplish the update. (OK->Download and Install Firmware Update->Insert Bind Plug in Aura port S7->YES->)
- After the procedure is complete, follow prompts to remove bind plug and power, then click OK.
Verifications and Flight Readiness Checks
Verify the Update
- Turn on your transmitter and apply power to your Aura/airborne system. Leave the model stationary for a few seconds to allow it to calibrate and boot
- Verify that you have control of the model
- Check your Aura status lights. You should see:
- Orange Solid LED indicating the sensor is calibrated and the Aura is powered and running
- A slow blinking Orange LED indicates excessive movement during sensor calibration, and it is best to do the power-up over.
- Green Solid LED indicating the Aura has a valid signal from the Tx/Rx
- You should NOT see a Blue Solid LED which is an indication of Failsafe for a DSM Satellite (other radio installs just follow the Receiver's 'valid' failsafe commands). Satellite users can test this by switching off your transmitter if you choose.
- Orange Solid LED indicating the sensor is calibrated and the Aura is powered and running
- With the Transmitter and Receiver still powered, Reconnect the USB cable
- Click the CONNECT button at the lower right of the Application window
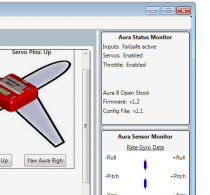
- Check the Aura Status Monitor at the top right of the Application window. Verify Firmware (version) 1.2
- Note: This information will not be displayed if your Rx/Tx is not connected and Aura is allowed to go into Auto-Detect mode
Important Note on Exponential Settings - Read before use
Aura FW1.2 had a bug that incorrectly calculated Exponential values and eliminated any Exponential feel on the control surfaces. If you are updating an Aura (FW1.2) already in use -or- re-using an existing Aura Config File (.acf), please check the Expo values and the control response before flying.
- Review all Expo values in all Flight Modes with the Aura Config Tool. If any values are high (ex. greater than 25%) consider whether they should be reduced. (All Config Files and Setups as provided by Flex Innovations have been reviewed, and are flight tested on FW1.3 and are good)
- Check control surface response to transmitter commands before flying after Configuration
- Be aware that since most model programs have exponential set, you will have the feel of more exponential when using FW1.3 compared to FW1.2.
Preparation for flight
- Conduct and pass the Flight Control Sensing Direction Test on per your manual.
- Conduct and pass the (transmitter) Control Direction Test on per your manual.
- With the model secured, perform a Failsafe Test (Include the throttle servo for fuel powered aircraft with the engine OFF)
- Re-install the Propeller/enable your power system (with the model secure and the prop clear, repeat Failsafe test again)
- Perform a normal range check, and Fly!!
For any questions, contact us at AuraSupport

