Difference between revisions of "FlexJet Pro/TurbineConversion"
(→General Notes and Tips) |
(→General Notes and Tips) |
||
| Line 48: | Line 48: | ||
*Elevator rates for take-off and landings can be at the pilot's choice. High rates are not typically needed as they may be on other jets. | *Elevator rates for take-off and landings can be at the pilot's choice. High rates are not typically needed as they may be on other jets. | ||
*'''Takeoffs''' can be accomplished at half or zero flaps. It is not very different. Consider zero flaps for moderate crosswinds. | *'''Takeoffs''' can be accomplished at half or zero flaps. It is not very different. Consider zero flaps for moderate crosswinds. | ||
| + | *Extended landing flares are not required. Land at a modest speed with the nosewheel off the ground. The trailing link struts really help the model to stick to the ground. The wheel brakes are quite effective. UP Elevator will help keep weight on the main wheels! | ||
*Turbines have very high exhaust gas velocities and can reach high speeds. Throttle management should be used. | *Turbines have very high exhaust gas velocities and can reach high speeds. Throttle management should be used. | ||
Revision as of 19:09, 8 July 2020
Contents
FlexJet Pro Turbine Conversion
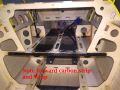
The FlexJet Pro was designed with turbine conversion in mind. The inlet was routed down to provide ample space for a fuel cell. The forward equipment tray was made removable so an alternate could be installed. The Tailcone is removeable to ease component installation.
The FlexJet Pro on a 4.5kg offers and excellent turbine experience. It gives an aerobatic 'fast jet' experience while never feeling heavy. Power is impressive and never lacking.
Flight time can vary depending on fuel tank install and flying style. The K-45 G3 flies about 4:20 with the 24oz main tank, and beyond 5:30 with the 34oz main tank. These times allow for startup, and ample reserves for a go around.
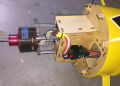
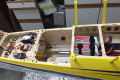
The primary conversion involves installing the turbine mounts and turbine. Installing the tailpipe, Assembling and installing the fuel tanks, and equipping and installing the forward equipment tray.
Turbine aircraft should be fitted with Wheel Brakes. These are drop in units!
NOTE: that KingTech recommends running the engine outside the model with the assembled equipment tray and fuel system. Flex Innovations used this procedure and had complete success.
Turbine Selection
- At the time of this writing, Flex Innovations has tested the KingTech K45 G3 and have found it to be a perfect match.
- The Zicoy X45 is very similar, and its mounting was considered in the design. It should be easily fitted as well.
- Flex Innovations in no way recommends turbines with greater than 4.5kg thrust.
- Turbines have very high exhaust gas velocities and can reach high speeds. Throttle management should be used.
Battery Selection
- Flight Pack (aka Radio) Batteries (2S LiPo)
- A single 2S 2000mAh 15C Lipo is a good choice When using a gyro-less setup, or when using the Aura Professional.
- Dual 2S 1400mAh+ batteries would also be a good choice, and the Aura Professional can connect them in and ideal fashion.
- Turbine (aka ECU) Battery (Follow your Turbine manufacturer's recommendations)
- The KingTech K45 G3 recommends a 3S LiFe
- Flex Innovations used the 3S 2200mAh LiFe from Spektrum.
- KingTech also sells a 3S LiPo you could choose.
- The KingTech K45 G3 recommends a 3S LiFe
Fuel System Components
- Setup your fuel system in a fashion compatible with your turbine manufacturer's instructions.
- Make sure to use Gas/Petrol compatible stoppers and clunk lines (not silicone)
- Flex Innovations used this 2oz UAT and the equipment tray accommodates it.
- A UAT eliminates air bubbles going to the fuel pump/turbine. An excellent fuel system required for reliable engine operations! Take great care.
- A 6oz Sullivan Flex Slant Tank (S738) was used as the Collector Tank (the Flex allows slight deformation of the tank for a relaxed fit)
- The Collector tanks takes the fuel from the main tank before delivering it to the UAT. It adds capacity and also buffers air-bubbles from the long main tank.
- A Sullivan 4oz non-flex Slant Tank (S437) could also be used
- Main Tank Choices
- A cost effective but smaller option is the Sullivan 24oz Slant Tank (S444). It fits and works well.
- Flex Innovations is working on a Custom Composite 35oz Tank for the best flight time.
General Notes and Tips
- We have found the small FlexJet Pro to operate just like any other turbine aircraft. We don't find it very different than it's larger counterparts.
- The fuel system is smaller than a large jet. Fill the tanks at a lower rate. (Ex. Use a 2S LiPo or LiFe on the fuel jug pump instead of a 3S)
- We set the FlexJet Pro (upright) on a table or stand when starting. This allows you to more easily monitor the start-up looking in the inlets and main landing gear doors. In the unlikely event of a start-up fire, it also allows faster and easier access to these locations for application of a fire extinguisher.
- Make your first flights about one minute shorter to allow for a stress free extra go-around if needed and to monitor your actual fuel system and fuel usage. Be sure to practice slow flight so you are prepared to land.
- We find the flaperons to be very useful on Landing as they allow slower speeds without tail-strikes. Consider 1/2 Flaperons for landings with moderate crosswinds or high headwinds.
- Elevator rates for take-off and landings can be at the pilot's choice. High rates are not typically needed as they may be on other jets.
- Takeoffs can be accomplished at half or zero flaps. It is not very different. Consider zero flaps for moderate crosswinds.
- Extended landing flares are not required. Land at a modest speed with the nosewheel off the ground. The trailing link struts really help the model to stick to the ground. The wheel brakes are quite effective. UP Elevator will help keep weight on the main wheels!
- Turbines have very high exhaust gas velocities and can reach high speeds. Throttle management should be used.
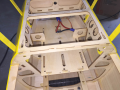
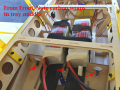
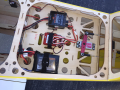
Reinforced the Battery Tray
Thin and medium CA Glue was used for all. See Images
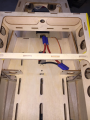
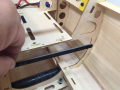
- Approximately 1/2 wide strips of Carbon plate (~.080" thick) was used in two places to reinforce the structure under the tray. It was wrapped to the structure with carbon chord (tow).
- At the aft end under the battery tray oriented vertically. Carbon chord wraps used.
- At the middle of the tray oriented flat against the bottom of the tray. Carbon chord wraps used.
- Two strips of Carbon plate were laminated to the top of the tray to stiffen it and to apply velcro® to.
- The aft edge of the plates were thinned to allow carbon chord wraps to be applied to prevent delamination.
- A hole were made in the front center of each plate, and the plated was wrapped to the existing structure with carbon chord to prevent delamination.
- Holes and slots were made in the tray to allow for carbon wraps, and velcro® straps
Motor and ESC
Tray Preparations
Tray Preparations
1 of 2 Carbon Strips
Strip in Middle
Aft Wraps
Overview

Aft Wraps
Middle Wraps
Middle Wraps
Radio Tray


