Difference between revisions of "Mamba/ElectricConversion"
(→Power System (as demonstrated by Flex Innovations)) |
|||
| (33 intermediate revisions by 2 users not shown) | |||
| Line 1: | Line 1: | ||
| − | + | {{DISPLAYTITLE:Mamba Electric Conversion}} | |
| + | == Mamba Electric Conversion == | ||
| + | The Mamba was designed with electric conversion in mind. The aircraft has designed in a forward hatch that makes access to batteries and connectors easy. The 'fuel tank tray' is located to work as a basis for a battery Tray/Mount. | ||
| − | + | Flight time of this relatively light 12S 6200mAh setup is about 4-4.5 minutes with proper throttle management and a good reserve. Make first flights about 2/3 of this time and check remainin capacity while breaking in and balancing your packs. | |
| − | The | + | The primary conversion is '''strengthening''' the 'fuel tank tray' to work as a 'battery tray'. |
| − | + | == Power System (as demonstrated by Flex Innovations) == | |
| − | + | * [http://www.horizonhobby.com/power-360-brushless-outrunner-motor--180kv-eflm4360a E-Flite 360 - 180kv Motor(EFLM4360A)] | |
| − | + | ** The chosen motor uses the same bolt pattern and firewall hole locations as a DA Gas Engine making mounting easy. | |
| − | + | ** The Prop bolt pattern also matches the DA 4-bolt pattern.<br /> | |
| − | Power System (as demonstrated by Flex | + | * 70mm total motor standoffs |
| − | * | + | * [https://www.flexinnovations.com/product/6s-6200mah-40c-lipo-battery/ Potenza 6S 6200mAh 40C batteries were used (Two in series (12S))] |
| − | http://www.horizonhobby.com/power-360-brushless-outrunner-motor--180kv-eflm4360a | + | * Castle 160HV ESC |
| − | + | * Mejzlik 25 x 12S Prop | |
| − | + | ||
| − | + | ||
| − | + | ||
| − | + | ||
| − | * | + | |
| − | + | ||
| − | * | + | |
| − | + | ||
| − | The chosen motor uses the same bolt pattern | + | |
| − | + | ||
| − | + | ||
| − | * | + | |
| − | * | + | |
| − | * | + | |
| − | + | ||
| − | + | ||
| − | + | ||
| − | + | ||
| − | + | ||
| + | == Reinforced the Battery Tray == | ||
| + | Thin and medium CA Glue was used for all. See Images | ||
| + | * Approximately 1/2 wide strips of Carbon plate (~.080" thick) was used in two places to reinforce the structure under the tray. It was wrapped to the structure with carbon chord (tow). | ||
| + | ** At the aft end under the battery tray oriented vertically. Carbon chord wraps used. | ||
| + | ** At the middle of the tray oriented flat against the bottom of the tray. Carbon chord wraps used. | ||
| + | * Two strips of Carbon plate were laminated to the top of the tray to stiffen it and to apply velcro® to. | ||
| + | ** The aft edge of the plates were thinned to allow carbon chord wraps to be applied to prevent delamination. | ||
| + | ** A hole were made in the front center of each plate, and the plated was wrapped to the existing structure with carbon chord to prevent delamination. | ||
| + | * Holes and slots were made in the tray to allow for carbon wraps, and velcro® straps | ||
<gallery> | <gallery> | ||
| − | + | IMG_7035.png|Motor and ESC | |
| − | + | IMG_7029.png|Tray Preparations | |
| − | + | IMG_7033.png|Tray Preparations | |
| − | IMG_7037.png| | + | IMG_7037.png|1 of 2 Carbon Strips |
| − | IMG_7043.png| | + | IMG_7043.png|Strip in Middle |
| − | IMG_7044.png| | + | IMG_7044.png|Aft Wraps |
| − | IMG_7047.png| | + | IMG_7047.png|Overview |
| − | IMG_7053C.png| | + | IMG_7053C.png|Aft Wraps |
| − | IMG_7054.png| | + | IMG_7054.png|Middle Wraps |
| − | IMG_7055.png| | + | IMG_7055.png|Middle Wraps |
| − | IMG_7056.png| | + | IMG_7056.png|Radio Tray |
</gallery> | </gallery> | ||
| + | |||
| + | <noinclude> | ||
| + | [[Category:ARF+ARFSV|ARF + ARFSV]] | ||
| + | [[Category:Mamba70cc|Mamba70cc]] | ||
| + | </noinclude> | ||
Latest revision as of 14:41, 24 September 2021
Mamba Electric Conversion
The Mamba was designed with electric conversion in mind. The aircraft has designed in a forward hatch that makes access to batteries and connectors easy. The 'fuel tank tray' is located to work as a basis for a battery Tray/Mount.
Flight time of this relatively light 12S 6200mAh setup is about 4-4.5 minutes with proper throttle management and a good reserve. Make first flights about 2/3 of this time and check remainin capacity while breaking in and balancing your packs.
The primary conversion is strengthening the 'fuel tank tray' to work as a 'battery tray'.
Power System (as demonstrated by Flex Innovations)
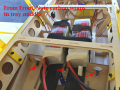
- E-Flite 360 - 180kv Motor(EFLM4360A)
- The chosen motor uses the same bolt pattern and firewall hole locations as a DA Gas Engine making mounting easy.
- The Prop bolt pattern also matches the DA 4-bolt pattern.
- 70mm total motor standoffs
- Potenza 6S 6200mAh 40C batteries were used (Two in series (12S))
- Castle 160HV ESC
- Mejzlik 25 x 12S Prop
Reinforced the Battery Tray
Thin and medium CA Glue was used for all. See Images
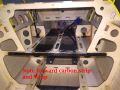
- Approximately 1/2 wide strips of Carbon plate (~.080" thick) was used in two places to reinforce the structure under the tray. It was wrapped to the structure with carbon chord (tow).
- At the aft end under the battery tray oriented vertically. Carbon chord wraps used.
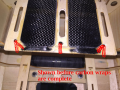
- At the middle of the tray oriented flat against the bottom of the tray. Carbon chord wraps used.
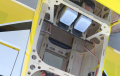
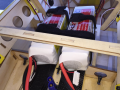
- Two strips of Carbon plate were laminated to the top of the tray to stiffen it and to apply velcro® to.
- The aft edge of the plates were thinned to allow carbon chord wraps to be applied to prevent delamination.
- A hole were made in the front center of each plate, and the plated was wrapped to the existing structure with carbon chord to prevent delamination.
- Holes and slots were made in the tray to allow for carbon wraps, and velcro® straps
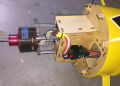
Motor and ESC
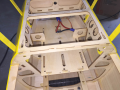
Tray Preparations
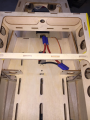
Tray Preparations
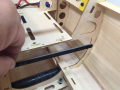
1 of 2 Carbon Strips
Strip in Middle
Aft Wraps
Overview
Aft Wraps
Middle Wraps
Middle Wraps
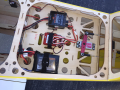
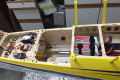
Radio Tray


